Vue2实战
这里看一个较为典型的基于 Vue 的项目实现,分析其中几个重点流程
这里选择了 vue-element-admin 这个项目骨架,它采用的技术与我们之前学过的较为契合
- vue 2
- element-ui 2
- vue-router 3
- vuex 3
- axios
安装
git clone https://gitee.com/panjiachen/vue-element-admin.git client-action

cd client-action

git branch -a

git checkout -b i18n remotes/origin/i18n

git config --global url."https://".insteadOf git://

npm install

npm run dev
- 需要切换分支到 i18n,否则不支持国际化(中文)功能
- npm install 要多试几次,因为中间会连接 gitbub 下载一些依赖,网络不稳定会导致失败
- npm run dev 运行后回自动打开浏览器,使用的端口是 9527
后端路径
开发环境下执行下面命令
npm run dev
- 会同时启动 mock-server
在开发环境下,后端访问路径起始路径配置在文件 .env.development 中
VUE_APP_BASE_API = '/dev-api'
- 默认向后台的请求都发给
http://localhost:9527/dev-api的 mock-server 获得的都是模拟数据 - 需要跟真实后台联调时,可以改动以上地址为
VUE_APP_BASE_API = 'http://localhost:8080/api'
发送请求的 axios 工具被封装在 src/utils/request.js 中
import axios from 'axios'
import { MessageBox, Message } from 'element-ui'
import store from '@/store'
import { getToken } from '@/utils/auth'

// create an axios instance
const service = axios.create({
  baseURL: process.env.VUE_APP_BASE_API, // url = base url + request url
  // withCredentials: true, // send cookies when cross-domain requests
  timeout: 5000 // request timeout
})

// ...
原有代码的 URI 路径都是这样的:
/vue-element-admin/user/login
/vue-element-admin/user/info
/vue-element-admin/user/logout
...
如果觉得不爽,可以来一个全局替换
/user/login
/user/info
/user/logout
...
token 的请求头修改一下,在 src/utils/request.js 中
...
service.interceptors.request.use(
  config => {
    // do something before request is sent

    if (store.getters.token) {
      // let each request carry token
      // ['X-Token'] is a custom headers key
      // please modify it according to the actual situation
      config.headers['Authorization'] = getToken()
    }
    return config
  },
  error => {
    // do something with request error
    console.log(error) // for debug
    return Promise.reject(error)
  }
)
...
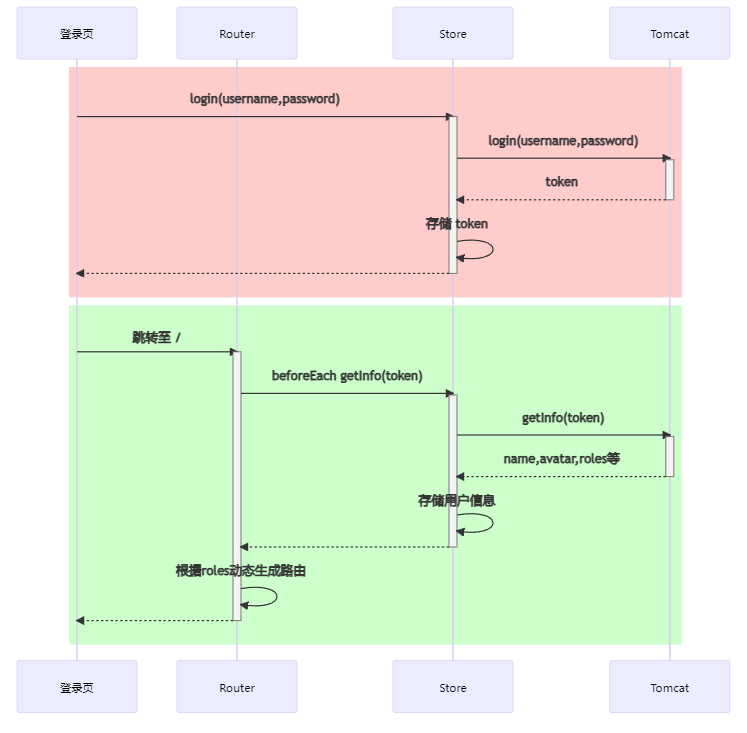
登录流程
1. src/views/login/index.vue
<script>
import { validUsername } from '@/utils/validate'
import LangSelect from '@/components/LangSelect'
import SocialSign from './components/SocialSignin'

export default {
  // ...
  methods: {
    handleLogin() {
      this.$refs.loginForm.validate(valid => {
        if (valid) {
          this.loading = true
          this.$store.dispatch('user/login', this.loginForm)
            .then(() => {
              this.$router.push({ path: this.redirect || '/', query: this.otherQuery })
              this.loading = false
            })
            .catch(() => {
              this.loading = false
            })
        } else {
          console.log('error submit!!')
          return false
        }
      })
    }
    // ...
  }
}
</script>
这里调用了 store 的 actions,user/login
- 因为是异步调用,因此只能用 actions
- 登录成功会优先跳转至 this.redirect 路径、否则跳转至 /
- / 查看
src/router/index.js的路由表可知,会重定向至 /dashboard
2. src/store/modules/user.js
import { login, logout, getInfo } from '@/api/user'
// ...
const actions = {
  // user login
  login({ commit }, userInfo) {
    const { username, password } = userInfo
    return new Promise((resolve, reject) => {
      login({ username: username.trim(), password: password }).then(response => {
        const { data } = response
        commit('SET_TOKEN', data.token)
        setToken(data.token)
        resolve()
      }).catch(error => {
        reject(error)
      })
    })
  }
  // ...
}
- 发请求用了
src/api/user.js,请求成功使用 commit 将 token 存入 mutations,同时往 cookie 存储了一份 - 这里的 response 其实是真正的 response.data,见后面的说明
- 评价
- 向 cookie 或 sessionStorage 存储 token 即可,token 无需做成响应式,不必放入 store
- 作者使用了 Promise API,其实可以改变为 await 方式,提高可读性
3. src/api/user.js
import request from '@/utils/request'

export function login(data) {
  return request({
    url: '/user/login',
    method: 'post',
    data
  })
}

// ...
- 其中 request 相当于我们之前封装的 myaxios
4. src/utils/request.js
import axios from 'axios'
import { MessageBox, Message } from 'element-ui'
import store from '@/store'
import { getToken } from '@/utils/auth'

// create an axios instance
const service = axios.create({
  baseURL: process.env.VUE_APP_BASE_API, // url = base url + request url
  // withCredentials: true, // send cookies when cross-domain requests
  timeout: 5000 // request timeout
})

// ...

service.interceptors.response.use(
  // ...
  response => {
    const res = response.data
    if (res.code !== 20000) {
      // ...
    } else {
      return res
    }
  },
  error => {
    // ...
  }
)

export default service
- 其中响应拦截器发现响应正确,返回 resp.data 这样,其它处代码解构时少了一层 data
5. src/permission.js
登录成功后,只是获得了 token,还未获取用户信息,获取用户信息是在路由跳转的 beforeEach 里做的
关键代码
import router from './router'

// ...

router.beforeEach(async(to, from, next) => {
  // ...
  const hasToken = getToken()

  if (hasToken) {
    if (to.path === '/login') {
      // ...
    } else {
      // ...
      const { roles } = await store.dispatch('user/getInfo')
      // ...
    }
  } else {
    // ...
  }
})
- 登录后跳转至 / 之前进入这里的 beforeEach 方法,方法内主要做两件事
- 一是调用 actions 方法获取用户角色,见 6
- 二是根据用户角色,动态生成路由,见 7
6. src/store/modules/user.js
这里用其中 getInfo 方法获取用户信息,其中角色返回给 beforeEach
import { login, logout, getInfo } from '@/api/user'
// ...
const actions = {
  getInfo({ commit, state }) {
    return new Promise((resolve, reject) => {
      getInfo(state.token).then(response => {
        const { data } = response

        if (!data) {
          reject('Verification failed, please Login again.')
        }

        const { roles, name, avatar, introduction } = data

        if (!roles || roles.length <= 0) {
          reject('getInfo: roles must be a non-null array!')
        }

        commit('SET_ROLES', roles)
        commit('SET_NAME', name)
        commit('SET_AVATAR', avatar)
        commit('SET_INTRODUCTION', introduction)
        resolve(data)
      }).catch(error => {
        reject(error)
      })
    })
  }
}
7. src/router/index.js
路由表中路由分成两部分,静态路由与动态路由
export const constantRoutes = [
  // ...
  {
    path: '/login',
    component: () => import('@/views/login/index'),
    hidden: true
  },
  {
    path: '/',
    component: Layout,
    redirect: '/dashboard',
    children: [
      {
        path: 'dashboard',
        component: () => import('@/views/dashboard/index'),
        name: 'Dashboard',
        meta: { title: 'dashboard', icon: 'dashboard', affix: true }
      }
    ]
  }
  // ...
]
- 其中 hidden: true 的路由只做路由跳转,不会在左侧导航菜单展示
动态路由
export const asyncRoutes = [
  {
    path: '/permission',
    component: Layout,
    redirect: '/permission/page',
    alwaysShow: true, // will always show the root menu
    name: 'Permission',
    meta: {
      title: 'permission',
      icon: 'lock',
      roles: ['admin', 'editor'] // you can set roles in root nav
    },
    children: [
      {
        path: 'page',
        component: () => import('@/views/permission/page'),
        name: 'PagePermission',
        meta: {
          title: 'pagePermission',
          roles: ['admin'] // or you can only set roles in sub nav
        }
      },
      {
        path: 'directive',
        component: () => import('@/views/permission/directive'),
        name: 'DirectivePermission',
        meta: {
          title: 'directivePermission'
          // if do not set roles, means: this page does not require permission
        }
      },
      {
        path: 'role',
        component: () => import('@/views/permission/role'),
        name: 'RolePermission',
        meta: {
          title: 'rolePermission',
          roles: ['admin']
        }
      }
    ]
  },

  {
    path: '/icon',
    component: Layout,
    children: [
      {
        path: 'index',
        component: () => import('@/views/icons/index'),
        name: 'Icons',
        meta: { title: 'icons', icon: 'icon', noCache: true, roles: ['admin'] }
      }
    ]
  }
  // ...
}
- 动态路由中关联了角色信息,根据用户的角色决定那些路由可用,但这样做的缺点是把角色和路由绑定死了
8. src/layout/index.vue
它对应的是我们之前介绍的 Container.vue 完成主页布局的,路由路径是 /
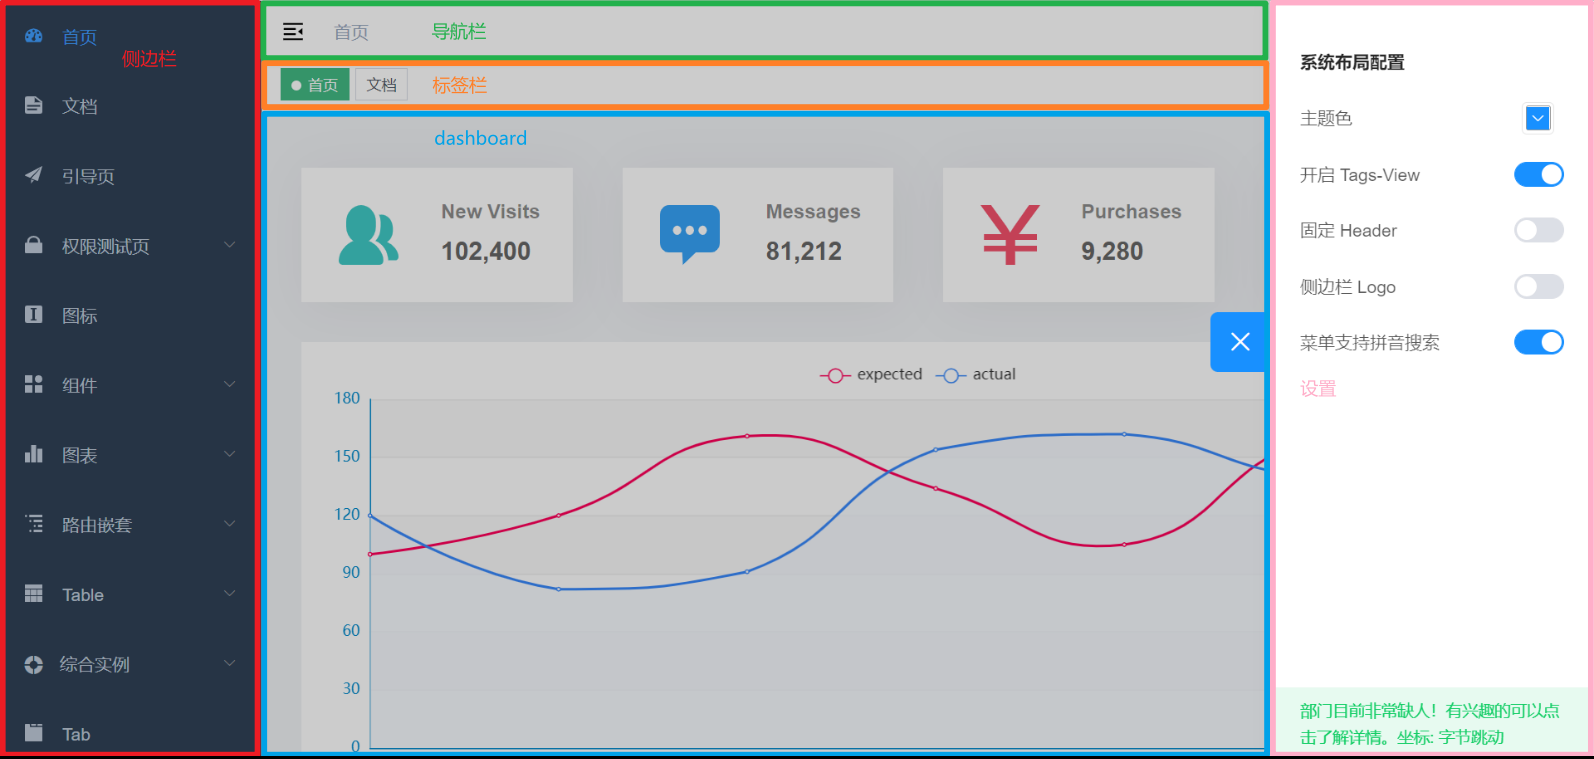
其中又由多部分组成,其中固定不变的是
- 侧边栏
- 导航栏
- 标签栏
- 设置
变化的是中间的 dashboard 部分(AppMain),它由 router-view 配合子路由切换显示
- 进入 / 后,就会 redirect 重定向到 /dashboard 子路由
- 进入首页后,会有一个
/api/transaction/list的后台请求报 404,作为练习,把它补充完整
第三方登录
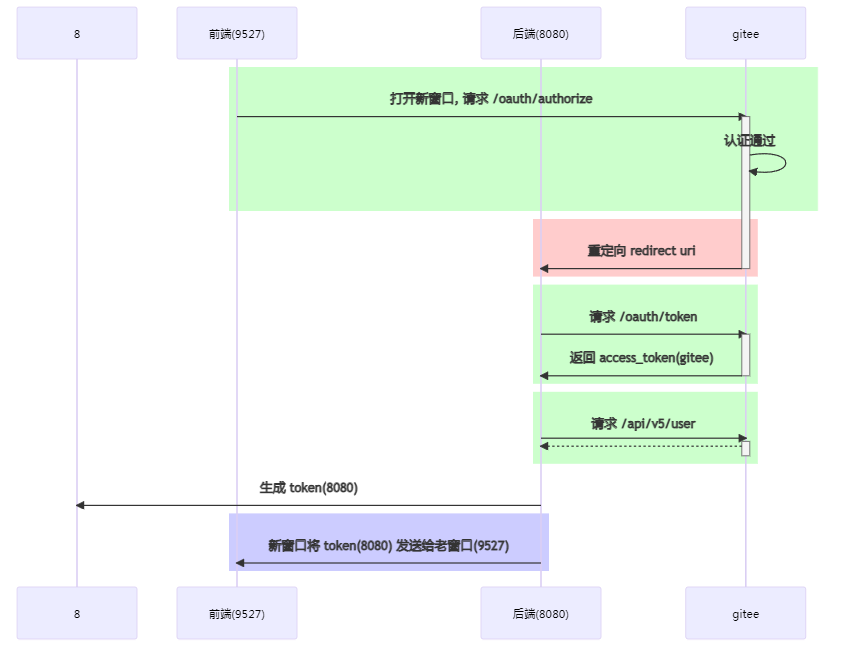
9527 打开新窗口,请求
https://gitee.com/oauth/authorize?client_id=${client_id}&redirect_uri=${redirect_uri}&response_type=codegitee 认证通过,重定向至 8080,并携带 code
8080 发送请求
https://gitee.com/oauth/token携带 client_id、client_secret、code,gitee 返回 access_token 给 8080这时走的是 https 协议,并且不经过浏览器,能够保证数据传输的安全性
重定向到 8080 时,如果被有心人拿到了 code,也没事,因为接下来会把 client_secret 发给 gitee 验证(client_secret 应当只存在 8080),只要 client_secret 不泄露,就可以保证安全
如果改成前端拿 code 换 access_token,那就意味着 access_token 得保存在前端,所有保存在前端的都有风险
8080 可以访问 gitee 的 api 了,拿到用户信息,存入数据库,返回 8080 的 token
8080 可以通过 window.opener.postMessage 把 token 给 9527 的老窗口
- 这里又会涉及到跨域,不过 9527 与 8080 直接存在信任关系,设置一下就好
9527 再走之前的逻辑就可以了,在 router 的 beforeEach 方法里,用 8080 token 换用户信息
增删改查
首先,在 api 里添加与后端交互的代码:src/api/student.js
import axios from '@/utils/request'

export function all() {
  return axios({
    url: '/students',
    method: 'get'
  })
}

export function deleteById(id) {
  return axios({
    url: `/students/${id}`,
    method: 'delete'
  })
}

export function update(id, dto) {
  return axios({
    url: `/students/${id}`,
    method: 'put',
    data: dto
  })
}

export function insert(dto) {
  return axios({
    url: `/students`,
    method: 'post',
    data: dto
  })
}
然后,添加新的路由:src/router/index.js
export const asyncRoutes = [
  // ...
  {
    path: '/student',
    component: Layout,
    children: [
      {
        path: 'index',
        component: () => import('@/views/student/index'),
        meta: { title: '学生管理', icon: 'el-icon-s-help', roles: ['admin'] }
      }
    ]
  },
  // ...
]
- 注意 title 这里没有考虑国际化
最后,添加新的视图界面:src/views/student/index.vue
<template>
  <div>
    <el-table :data="students">
      <el-table-column label="编号" prop="id"></el-table-column>
      <el-table-column label="姓名" prop="name"></el-table-column>
      <el-table-column label="性别" prop="sex"></el-table-column>
      <el-table-column label="年龄" prop="age"></el-table-column>
      <el-table-column fixed="right" label="操作" width="100">
        <template slot-scope="scope">
          <el-button @click="handleUpdate(scope.row)" type="text" size="small">修改</el-button>
          <el-button @click="handleDelete(scope.row)" type="text" size="small">删除</el-button>
        </template>
      </el-table-column>
    </el-table>

    <el-dialog width="22%" :visible.sync="updateDialogVisible">
      <el-form :model="updateForm">
        <el-form-item label="编号">
          <el-input size="mini" :readonly="true" v-model="updateForm.id"></el-input>
        </el-form-item>
        <el-form-item label="姓名">
          <el-input size="mini" v-model="updateForm.name"></el-input>
        </el-form-item>
        <el-form-item label="性别">
          <el-select size="mini" v-model="updateForm.sex">
            <el-option value="男"></el-option>
            <el-option value="女"></el-option>
          </el-select>
        </el-form-item>
        <el-form-item label="年龄">
          <el-input size="mini" v-model="updateForm.age"></el-input>
        </el-form-item>
        <el-form-item>
          <el-button type="primary" size="mini" @click="confirmUpdate()">确定</el-button>
        </el-form-item>
      </el-form>
    </el-dialog>
  </div>
</template>
<script>
import { all, deleteById, update, insert } from '@/api/student'
const options = {
  mounted() {
    this.all()
  },
  data() {
    return {
      students: [],
      updateDialogVisible: false,
      updateForm: {
        id: 0,
        name: '',
        sex: '男',
        age: 0
      }
    }
  },
  methods: {
    async confirmUpdate() {
      await update(this.updateForm.id, this.updateForm)
      this.updateDialogVisible = false
      this.all()
    },
    handleUpdate(row) { // {id, name, sex, age}
      this.updateDialogVisible = true
      this.updateForm = { ...row }
      // this.updateForm = row // 错误写法,不能让他俩指向同一个对象
    },
    async handleDelete(row) {
      try {
        await this.$confirm('此操作将永久删除该学生, 是否继续?', '提示', {
          confirmButtonText: '确定',
          cancelButtonText: '取消',
          type: 'warning'
        })
        await deleteById(row.id)
        this.all()
      } catch (e) {
        console.log('取消删除')
      }
    },
    async all() {
      const { data } = await all()
      this.students = data
    }
  }
}
export default options
</script>
<style scoped>
.el-input,
.el-select {
  width: 180px;
}
</style>
- 其中 handleUpdate 和 handleDelete 接收的参数,都是代表了当前行的学生对象