Vue3 进阶
1) Antdv
添加必要插件
npm install ant-design-vue
- ant-design-vue 组件库插件
引入 antdv 功能,修改 main.ts
import { createApp } from 'vue'
import './style.css'
import App from './App.vue'
import antd from 'ant-design-vue'
import 'ant-design-vue/dist/antd.css'

createApp(App).use(antd).mount('#app')
表格
<template>
  <!-- <a-table :columns="columns" :dataSource="students" rowKey="id"></a-table> -->
  <a-table :columns="columns" :dataSource="students" :rowKey="rowKey"></a-table>
</template>
<script setup lang="ts">
import axios from "../api/request";
import { ref, computed } from "vue";
import { useRequest } from "vue-request";
import { AxiosRespList, Student } from "../model/Model8080";

const {data} = useRequest<AxiosRespList<Student>>(
  ()=>axios.get('/api/students')
)

const students = computed(()=>{
  return data.value?.data.data || []
})

function rowKey(r:Student) {
  return r.id
}

const columns = ref([
  {
    title:'编号',
    dataIndex:'id'
  },
  {
    title:'姓名',
    dataIndex:'name'
  },
  {
    title:'性别',
    dataIndex:'sex'
  },
  {
    title:'年龄',
    dataIndex:'age'
  }
])
</script>
分页
<template>
  <a-table :columns="columns" :data-source="students" row-key="id"
   :pagination="pagination" @change="tableChange"></a-table>
</template>
<script setup lang="ts">
import axios from "../api/request";
import { ref, computed } from "vue";
import { usePagination } from "vue-request";
import { AxiosRespPage, Student, StudentQueryDto } from "../model/Model8080";
import { PaginationProps } from "ant-design-vue";
import DateBody from "ant-design-vue/lib/vc-picker/panels/DatePanel/DateBody";

const dto = ref({page: 1, size: 5})

const {data, total, run} = usePagination<AxiosRespPage<Student>, StudentQueryDto[]>(
  (d)=> axios.get('/api/students/q', {params:d}),
  {
    defaultParams: [dto.value],
    pagination: {
      currentKey: "page",
      pageSizeKey: 'size',
      totalKey: 'data.data.total'
    }
  }
)

// 在页号或页大小改变时调用
function tableChange(pagination: PaginationProps) {
  console.log(pagination)
  dto.value.page = pagination.current ?? 1
  dto.value.size = pagination.pageSize ?? 5
  run(dto.value)
}

const pagination = computed<PaginationProps>(()=>{
  return {
    current: dto.value.page, // 当前页
    pageSize: dto.value.size, // 页大小
    total: total.value,       // 总记录数
    showSizeChanger: true,    // 显示页大小的下拉列表
    pageSizeOptions: ["1","2","3","4","5"] // 自定义下拉列表内容
  }
})

const students = computed(()=>{
  return data.value?.data.data.list || []
})

const columns = ref([
  {
    title: "编号",
    dataIndex: "id",
  },
  {
    title: "姓名",
    dataIndex: "name",
  },
  {
    title: "性别",
    dataIndex: "sex",
  },
  {
    title: "年龄",
    dataIndex: "age",
  },
]);
</script>
搜索、删除
<template>
  <a-row>
    <a-col :span="2">
      <a-button type="primary" size="small">新增</a-button>
    </a-col>
    <a-col :span="4">
      <a-popconfirm title="确认要删除选中学生吗?"
        ok-text="确定" cancel-text="取消" @confirm="onDeleteIds"
        @visibleChange="onVisibleChange" :visible="visible">
        <a-button type="primary" size="small">删除选中</a-button>
      </a-popconfirm>
    </a-col>
    <a-col :span="4">
    </a-col>
    <a-col :span="4">
      <a-input v-model:value="dto.name" placeholder="输姓名" size="small"></a-input>
    </a-col>
    <a-col :span="4">
      <a-select v-model:value="dto.sex" placeholder="选性别" :allowClear="true" size="small">
        <a-select-option value="男">男</a-select-option>
        <a-select-option value="女">女</a-select-option>
      </a-select>
    </a-col>
    <a-col :span="4">
      <a-select v-model:value="dto.age" placeholder="选年龄" :allowClear="true" size="small">
        <a-select-option value="0,20">20以下</a-select-option>
        <a-select-option value="21,30">21~30</a-select-option>
        <a-select-option value="31,40">31~40</a-select-option>
        <a-select-option value="40,120">40以上</a-select-option>
      </a-select>
    </a-col>
    <a-col :span="2">
      <a-button @click="tableChange" type="primary" size="small">搜索</a-button>
    </a-col>
  </a-row>
  <hr>
  <a-table :columns="columns" :data-source="students" row-key="id"
    :pagination="pagination" @change="tableChange"
    :row-selection="{selectedRowKeys:ids,onChange:onSelectChange}">
    <template #bodyCell="{column, record}">
      <template v-if="column.dataIndex==='name'">
      {{record.name + (record.sex==='男'?'(大侠)':'(女侠)')}}
      </template>

      <template v-else-if="column.dataIndex==='operation'">
      <a>修改</a>
      <a-divider type="vertical"></a-divider>
      <a-popconfirm title="确认要删除该学生吗?"
        ok-text="确定" cancel-text="取消" @confirm="onDelete(record.id)">
        <a>删除</a>
      </a-popconfirm>
      </template>
    </template>
  </a-table>

</template>
<script setup lang="ts">
import axios from "../api/request";
import { ref, computed } from "vue";
import { usePagination, useRequest } from "vue-request";
import { AxiosRespPage, AxiosRespString, Student, StudentQueryDto } from "../model/Model8080";
import { PaginationProps } from "ant-design-vue";

// >>>>>>>>>>>>>> 搜索功能开始
const dto = ref({page: 1, size: 5, name: '', sex: null, age: null})

const {data, total, run: search} = usePagination<AxiosRespPage<Student>, StudentQueryDto[]>(
  (d) => axios.get('/api/students/q', {params:d}),
  {
    defaultParams: [dto.value],
    pagination: {
      currentKey: "page",
      pageSizeKey: 'size',
      totalKey: 'data.data.total'
    }
  }
)

function tableChange(pagination: PaginationProps) {
  // console.log(pagination)
  dto.value.page = pagination.current ?? 1
  dto.value.size = pagination.pageSize ?? 5
  search(dto.value)
}

const pagination = computed<PaginationProps>(()=>{
  return {
    current: dto.value.page, // 当前页
    pageSize: dto.value.size, // 页大小
    total: total.value,       // 总记录数
    showSizeChanger: true,    // 显示页大小的下拉列表
    pageSizeOptions: ["1","2","3","4","5"] // 自定义下拉列表内容
  }
})

const students = computed(()=>{
  return data.value?.data.data.list || []
})
// <<<<<<<<<<<<<< 搜索功能结束


// >>>>>>>>>>>>>> 删除功能开始
async function onDelete(id:number) {
  // console.log("学生id是:"+id)
  await deleteById(id)      // 删除请求 删除响应
  search(dto.value)        //                   查询请求 查询响应
}

const { runAsync: deleteById } = useRequest<AxiosRespString, number[]>(
  (id) => axios.delete(`/api/students/${id}`),
  {
    manual: true
  }
)
// <<<<<<<<<<<<<< 删除功能结束

// >>>>>>>>>>>>>> 删除选中开始
const ids = ref<number[]>([])

function onSelectChange(keys:number[]) {
  // console.log(keys)
  ids.value = keys
}

async function onDeleteIds() {
  await deleteByIds(ids.value)
  ids.value = []
  search(dto.value)
}

const { runAsync: deleteByIds } = useRequest<AxiosRespString, number[][]>(
  (ids)=>axios.delete('/api/students', {data: ids}),
  {
    manual: true
  }
)

const visible = ref(false)

function onVisibleChange(v:boolean) {
  if(!v) { // 希望隐藏
    visible.value = false
  } else { // 希望显示
    visible.value = ids.value.length > 0
  }
}
// <<<<<<<<<<<<<< 删除选中结束

const columns = ref([
  {
    title: "编号",
    dataIndex: "id",
  },
  {
    title: "姓名",
    dataIndex: "name",
  },
  {
    title: "性别",
    dataIndex: "sex",
  },
  {
    title: "年龄",
    dataIndex: "age",
  },
  {
    title: '操作',
    dataIndex: 'operation'
  }
]);
</script>
<style scoped>
  .ant-input, .ant-select {
    width: 80px;
  }
</style>
新增、修改
子组件
<template>
  <a-modal :visible="visible" :title="title"
    @ok="onOk" @cancel="onCancel">
    <a-form>
      <a-form-item label="编号" v-if="id">
        <a-input readonly v-model:value="id"></a-input>
      </a-form-item>
      <a-form-item label="姓名">
        <a-input v-model:value="dto.name"></a-input>
      </a-form-item>
      <a-form-item label="性别">
        <a-radio-group v-model:value="dto.sex">
          <a-radio-button value="男">男</a-radio-button>
          <a-radio-button value="女">女</a-radio-button>
        </a-radio-group>
      </a-form-item>
      <a-form-item label="年龄">
        <a-input-number v-model:value="dto.age"></a-input-number>
      </a-form-item>
    </a-form>
  </a-modal>
</template>
<script setup lang="ts">
import axios from "../api/request";
import { ref, computed } from "vue";
import { useRequest } from "vue-request";
import { StudentSaveDto, AxiosRespString } from "../model/Model8080";
import { Form } from 'ant-design-vue'

// 定义属性
const props = defineProps<{id:number, dto:StudentSaveDto, visible:boolean}>()

const title = computed(()=> props.id===0?'新增学生':'修改学生')

// 定义事件
const emit = defineEmits(['update:visible', 'saved'])

async function onOk() {
  if(props.id === 0) {
    await insert(props.dto)
  } else {
    await update(props.dto)
  }
  emit('saved')
  // 发送事件给父组件, 希望把 visible 改为 false
  emit('update:visible', false)
}

function onCancel() {
  // 发送事件给父组件, 希望把 visible 改为 false
  emit('update:visible', false)
}

const {runAsync:insert} = useRequest<AxiosRespString,StudentSaveDto[]>(
  (dto)=>axios.post('/api/students', dto),
  {
    manual: true
  }
)

const {runAsync:update} = useRequest<AxiosRespString,StudentSaveDto[]>(
  (dto)=>axios.put(`/api/students/${props.id}`, dto),
  {
    manual: true
  }
)
</script>
父组件使用子组件
<A4Save :id="id" :dto="saveDto" v-model:visible="saveVisible"></A4Save>

<script setup lang="ts">
// ...
// >>>>>>>>>>>>>> 新增、修改开始
const saveVisible = ref(false)
const id = ref(0)
const saveDto = reactive({name:'', sex:'男', age:18})

function onInsert() {
  saveVisible.value = true
  id.value = 0
  Object.assign(saveDto, {name:'', sex:'男', age:18})
}

function onUpdate(record: Student) {
  saveVisible.value = true
  id.value = record.id
  Object.assign(saveDto, record)
}

function onSaved() {
  search(dto.value)
}
// <<<<<<<<<<<<<< 新增、修改结束
</script>
saveDto 使用 reactive 包装,是为了解决后续表单校验失效问题
Object.assign 是将源对象(参数2)的属性值赋值给目标对象(参数1)的同名属性,效果等价于
saveDto.name = record.name
saveDto.sex = record.sex
saveDto.age = record.age
全局消息
在 request.ts 中对响应消息统一处理
import { message } from 'ant-design-vue'

// ...
// 响应拦截器
_axios.interceptors.response.use(
  (response)=>{ // 状态码  2xx
    if(response.data.message) {
      message.success(response.data.message, 3)
    }
    // ...
  },
  (error)=>{ // 状态码 > 2xx, 400,401,403,404,500
    // ...
  }
)
表单校验
<template>
  <a-modal :visible="visible" :title="title"
    @ok="onOk" @cancel="onCancel">
    <a-form>
      <a-form-item label="编号" v-if="id">
        <a-input readonly v-model:value="id"></a-input>
      </a-form-item>
      <a-form-item label="姓名" v-bind="validateInfos.name">
        <a-input v-model:value="dto.name"></a-input>
      </a-form-item>
      <a-form-item label="性别" v-bind="validateInfos.sex">
        <a-radio-group v-model:value="dto.sex">
          <a-radio-button value="男">男</a-radio-button>
          <a-radio-button value="女">女</a-radio-button>
        </a-radio-group>
      </a-form-item>
      <a-form-item label="年龄" v-bind="validateInfos.age">
        <a-input-number v-model:value="dto.age"></a-input-number>
      </a-form-item>
    </a-form>
  </a-modal>
</template>
<script setup lang="ts">
import axios from "../api/request";
import { ref, computed } from "vue";
import { useRequest } from "vue-request";
import { StudentSaveDto, AxiosRespString } from "../model/Model8080";
import { Form } from 'ant-design-vue'

// 定义属性
const props = defineProps<{id:number, dto:StudentSaveDto, visible:boolean}>()

const title = computed(()=> props.id===0?'新增学生':'修改学生')

// 定义事件
const emit = defineEmits(['update:visible', 'saved'])

async function onOk() {
  try {
    // 提交前校验
    await validate()
    if(props.id === 0) {
      await insert(props.dto)
    } else {
      await update(props.dto)
    }
    emit('saved')
    // 发送事件给父组件, 希望把 visible 改为 false
    emit('update:visible', false)
  } catch (e) {
    console.error(e)
  }
}

function onCancel() {
  // 发送事件给父组件, 希望把 visible 改为 false
  emit('update:visible', false)
}

const {runAsync:insert} = useRequest<AxiosRespString,StudentSaveDto[]>(
  (dto)=>axios.post('/api/students', dto),
  {
    manual: true
  }
)

const {runAsync:update} = useRequest<AxiosRespString,StudentSaveDto[]>(
  (dto)=>axios.put(`/api/students/${props.id}`, dto),
  {
    manual: true
  }
)

const rules = ref({
  name: [
    {required: true, message:'姓名必须'},
    {min:2, message:'字符数至少为2'}
  ],
  sex: [
    {required: true, message:'性别必须'}
  ],
  age: [
    {required: true, message:'年龄必须'},
    {min:10, message:'年龄最小为10岁', type:'number'},
    {max:120, message:'年龄最大为120岁', type:'number'}
  ]
})

// 参数1: 待校验的数据
// 参数2: 校验规则
const { validateInfos, validate } = Form.useForm(props.dto, rules)
</script>
2) vue-router
安装
npm install vue-router@4
创建 router
首先创建一个 /src/router/a5router.ts 文件,在其中定义路由
import {createRouter, createWebHashHistory} from 'vue-router'
import A51 from '../views/A51.vue'
import A52 from '../views/A52.vue'
// 路由 => 路径和组件之间的对应关系
const routes = [
  {
    path: '/a1',
    component: A51
  },
  {
    path: '/a2',
    component: A52
  }
]

const router = createRouter({
  history: createWebHashHistory(), // 路径格式
  routes: routes // 路由数组
})

export default router
createWebHashHistory 是用 # 符号作为【单页面】跳转技术,上面两个路由访问时路径格式为
- http://localhost:7070/#/a1
- http://localhost:7070/#/a2
每个路由都有两个必须属性
path:路径
component:组件
createRouter 用来创建 router 对象,作为默认导出
需要在 main.ts 中导入 router 对象:
// ...
import A5 from './views/A5.vue'  // vue-router
import router from './router/a5router'
createApp(A5).use(antdv).use(router).mount('#app')
A5 是根组件,不必在 router 中定义,但需要在其中定义 router-view,用来控制路由跳转后,A51、A52 这些组件的显示位置,内容如下
<template>
  <div class="a5">
    <router-view></router-view>
  </div>
</template>
效果如下


动态导入
import {createRouter, createWebHashHistory} from 'vue-router'
import A51 from '../views/A51.vue'
import A52 from '../views/A52.vue'
const routes = [
  // ...
  {
    path: '/a3',
    component: () => import('../views/A53.vue')
  }
]
- 用 import 关键字导入,效果是打包时会将组件的 js 代码都打包成一个大的 js 文件,如果组件非常多,会影响页面加载速度
- 而 import 函数导入(动态导入),则是按需加载,即
- 当路由跳转到 /a3 路径时,才会去加载 A53 组件对应的 js 代码
- vue-router 官方推荐采用动态导入
嵌套路由
如果希望再嵌套更深层次的路由跳转,例如:希望在 A53 组件内再进行路由跳转

首先,修改 A53.vue
<template>
  <div class="a53">
    <router-view></router-view>
  </div>
</template>
其次,再修改 /src/router/a5router.ts 文件 内容
import {createRouter, createWebHashHistory} from 'vue-router'
import A51 from '../views/A51.vue'
import A52 from '../views/A52.vue'
const routes = [
  // ...
  {
    path: '/a3',
    component: () => import('../views/A53.vue'),
    children: [
      {
        path: 'student',
        component: () => import('../views/A531.vue')
      },
      {
        path: 'teacher',
        component: () => import('../views/A532.vue')
      }
    ]
  }
]

// ...
将来访问 /a3/student 时,效果为

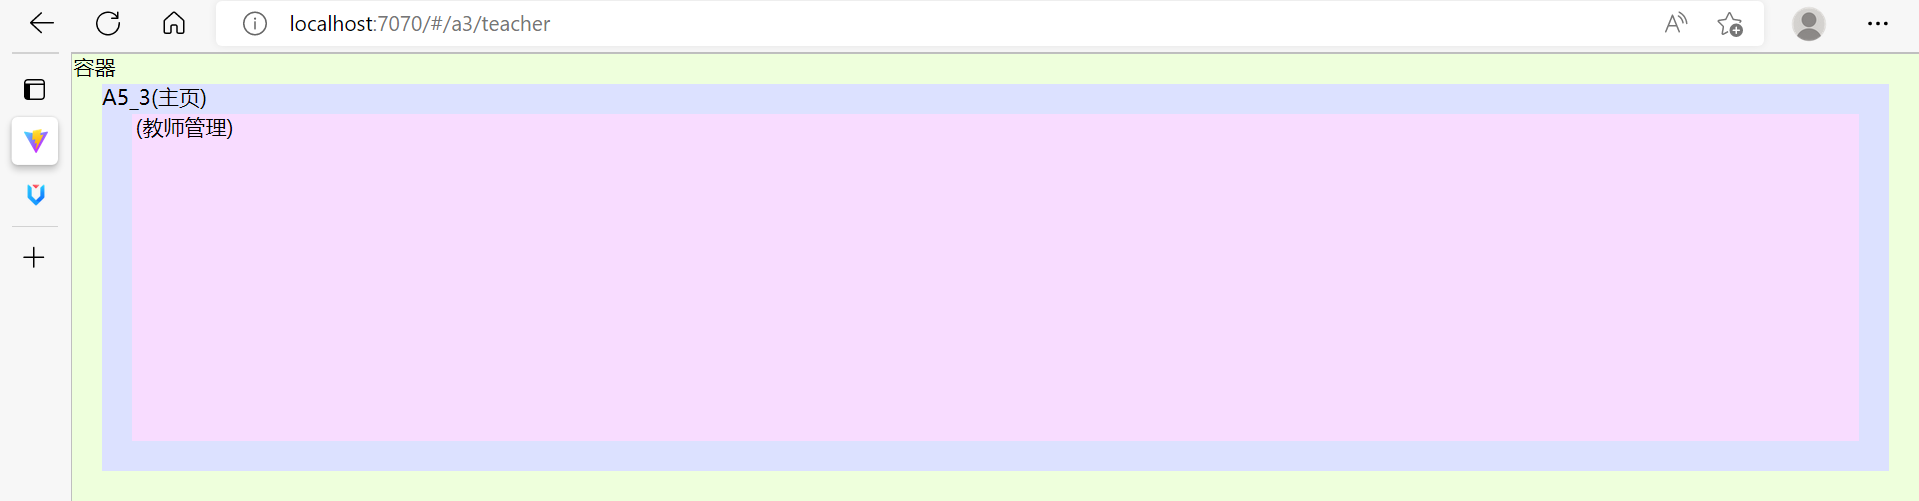
访问 /a3/teacher 时,效果为
重定向
用法1
import {createRouter, createWebHashHistory} from 'vue-router'
import A51 from '../views/A51.vue'
import A52 from '../views/A52.vue'
const routes = [
  // ...
  {
    path: '/a3',
    component: () => import('../views/A53.vue'),
    redirect: '/a3/student', // 重定向到另外路径
    children: [
      {
        path: 'student',
        component: () => import('../views/A531.vue')
      },
      {
        path: 'teacher',
        component: () => import('../views/A532.vue')
      }
    ]
  }
]
// ...
效果是,页面输入 /a3,紧接着会重定向跳转到 /a3/student
用法2
import {createRouter, createWebHashHistory} from 'vue-router'
import A51 from '../views/A51.vue'
import A52 from '../views/A52.vue'
const routes = [
  {
    path: '/a1',
    component: A51
  },
  {
    path: '/a2',
    component: A52
  },
  // ...
  {
    path: '/:pathMatcher(.*)*', // 可以匹配剩余的路径
    redirect: '/a2'
  }
]
// ...
效果是,当页面输入一个不存在路径 /aaa 时,会被 path: '/:pathMatcher(.*)*' 匹配到,然后重定向跳转到 A52 组件去
主页布局
借助 antdv 的 layout 组件,可以实现主页【上】【左】【右】布局
<template>
  <div class="a53">
    <a-layout>
      <a-layout-header></a-layout-header>
      <a-layout>
        <a-layout-sider></a-layout-sider>
        <a-layout-content>
          <router-view></router-view>
        </a-layout-content>
      </a-layout>
    </a-layout>
  </div>
</template>
<style scoped>
.a53 {
  height: 100%;
  background-color: rgb(220, 225, 255);
  background-image: url("data:image/svg+xml,%3Csvg xmlns='http://www.w3.org/2000/svg'%3E%3Ctext x='35' y='10' font-size='14' font-family='system-ui, sans-serif' text-anchor='middle' dominant-baseline='middle'%3EA53(主页)%3C/text%3E%3C/svg%3E");
  padding: 20px;
  box-sizing: border-box;
}
.ant-layout-header {
  height: 50px;
  background-color:darkseagreen;
}

.ant-layout-sider {
  background-color:lightsalmon;
}

.ant-layout-content {
  background-color: aliceblue;
}

.ant-layout-footer {
  background-color:darkslateblue;
  height: 30px;
}

.ant-layout {
  height: 100%;
}

.ant-layout-has-sider {
  height: calc(100% - 50px);
}
</style>
侧边栏菜单
<template>
  <div class="a53">
    <a-layout>
      <a-layout-header></a-layout-header>
      <a-layout>
        <a-layout-sider>
          <a-menu theme="dark" mode="inline">
            <a-menu-item :key="1">
              <router-link to="/a3/student">菜单1</router-link>
            </a-menu-item>
            <a-menu-item :key="2">
              <router-link to="/a3/teacher">菜单2</router-link>
            </a-menu-item>
            <a-menu-item :key="3">菜单3</a-menu-item>
            <a-sub-menu :key="4" title="菜单4">
              <a-menu-item :key="41">菜单41</a-menu-item>
              <a-menu-item :key="42">菜单42</a-menu-item>
            </a-sub-menu>
          </a-menu>
        </a-layout-sider>
        <a-layout-content>
          <router-view></router-view>
        </a-layout-content>
      </a-layout>
    </a-layout>
  </div>
</template>
- a-menu-item 与 a-sub-menu 都必须为 key 属性唯一赋值,否则会产生混乱
- router-link 标签用来切换路由,to 是目标路由的路径
- theme 属性定义菜单的主题(默认亮色主题,dark 为暗色主题)
- mode 属性定义子菜单的展示模式(默认弹出,inline 显示在下方)
菜单图标
安装图标依赖
npm install @ant-design/icons-vue
菜单中使用图标
<template>
  <div class="a53">
    <a-layout>
      <a-layout-header></a-layout-header>
      <a-layout>
        <a-layout-sider>
          <a-menu theme="dark" mode="inline">
            <a-menu-item :key="1">
              <template #icon>
                <highlight-outlined />
              </template>
              <router-link to="/a3/student">菜单1</router-link>
            </a-menu-item>
            <a-menu-item :key="2">
              <template #icon>
                <align-center-outlined />
              </template>
              <router-link to="/a3/teacher">菜单2</router-link>
            </a-menu-item>
            <a-menu-item :key="3">
              <template #icon>
                <strikethrough-outlined />
              </template>
              菜单3</a-menu-item>
            <a-sub-menu :key="4" title="菜单4">
              <template #icon>
                <sort-descending-outlined />
              </template>
              <a-menu-item :key="41">菜单41</a-menu-item>
              <a-menu-item :key="42">菜单42</a-menu-item>
            </a-sub-menu>
          </a-menu>
        </a-layout-sider>
        <a-layout-content>
          <router-view></router-view>
        </a-layout-content>
      </a-layout>
    </a-layout>
  </div>
</template>
<script setup lang="ts">
import {HighlightOutlined, AlignCenterOutlined, StrikethroughOutlined, SortDescendingOutlined} from '@ant-design/icons-vue'
</script>
- 图标组件没有全局绑定,需要 import 之后才能使用
- 用
<template #icon></template>插槽,才能确定图标展示的位置(菜单文字之前)
二次封装图标组件
最终希望用统一的图标组件去使用图标,图标名只是作为一个属性值传递进去,例如:
使用者
<template>
  <a-icon icon="highlight-outlined"></a-icon>
  <a-icon icon="align-center-outlined"></a-icon>
  <a-icon icon="strikethrough-outlined"></a-icon>
  <a-icon icon="sort-descending-outlined"></a-icon>
</template>
<script setup lang="ts">
import AIcon from '../components/AIcon1.vue'
</script>
方法1,使用 vue 组件
<script lang="ts" setup>
import {HighlightOutlined, AlignCenterOutlined, StrikethroughOutlined, SortDescendingOutlined} from '@ant-design/icons-vue'
const props = defineProps<{icon:string}>()
</script>
<template>
  <highlight-outlined v-if="icon==='highlight-outlined'"></highlight-outlined>
  <align-center-outlined v-else-if="icon==='align-center-outlined'"></align-center-outlined>
  <strikethrough-outlined v-else-if="icon==='strikethrough-outlined'"></strikethrough-outlined>
  <sort-descending-outlined v-else-if="icon==='sort-descending-outlined'"></sort-descending-outlined>
</template>
- 缺点:实现太笨
方法2,使用函数式组件
import { h } from "vue"
import * as Icons from '@ant-design/icons-vue'

interface Module {
  [p:string]: any
}

// 参数1: 组件属性
const AIcon = (props:{icon:string}) => {
  // console.log(props.icon)
  // console.log(Icons)
  // 参数1: 组件对象
  const im: Module = Icons
  return h(im[toCamelCase(props.icon)])
}

export default AIcon

// 将-分隔的单词转换为大驼峰命名的单词
function toCamelCase(str: string) { // highlight-outlined
  return str.split('-') // ['highlight', 'outlined']
    .map((e)=> e.charAt(0).toUpperCase() + e.slice(1) ) // ['Highlight', 'Outlined']
    .join('')
}
/*
Icons 的结构如下
{
  HighlightOutlined: HighlightOutlined组件对象,
  MonitorOutlined: MonitorOutlined组件对象,
  ...
}
*/
- 需要动态生成标签的时候,可以考虑使用函数式组件
方法3,使用 jsx 组件
首先,安装
npm install @vitejs/plugin-vue-jsx -D
配置 vite.config.ts
import { defineConfig } from 'vite'
import vue from '@vitejs/plugin-vue'
import vueJsx from '@vitejs/plugin-vue-jsx'

// https://vitejs.dev/config/
export default defineConfig({
  plugins: [vue(), vueJsx()]
})
编写一个 Hi.tsx 组件
export default {
  props: {
    msg: String
  },
  setup(props: { msg: string }) {
    return () => <h5>{props.msg}</h5>
  }
}
然后被其它组件使用
<script setup lang="ts">
import Hi from '../components/Hi'
</script>

<template>
  <Hi msg="Hello,World"></Hi>
</template>
用 jsx 实现图标组件
import * as Icons from '@ant-design/icons-vue'

interface Module {
  [p:string]: any
}

function toCamelCase(str: string) { // highlight-outlined
  return str
    .split("-") // ['highlight', 'outlined']
    .map((e) => e.charAt(0).toUpperCase() + e.slice(1)) // ['Highlight', 'Outlined']
    .join(""); // HighlightOutlined
}

export default {
  props: {
    icon: String
  },
  setup(props: {icon: string}) {
    const im: Module = Icons
    const tag = im[toCamelCase(props.icon)] // 图标组件
    // HighlightOutlined
    return ()=> <tag></tag> // 返回组件标签
  }
}
动态路由与菜单
路由文件
a6router.js
import { createRouter, createWebHashHistory } from 'vue-router'
import { useStorage } from '@vueuse/core'
import { Route, Menu } from '../model/Model8080'
const clientRoutes = [
  {
    path: '/login',
    name: 'login',
    component: () => import('../views/A6Login.vue')
  },
  {
    path: '/404',
    name: '404',
    component: () => import('../views/A6NotFound.vue')
  },
  {
    path: '/',
    name: 'main',
    component: () => import('../views/A6Main.vue')
  },
  {
    path: '/:pathMatcher(.*)*',
    name: 'remaining',
    redirect: '/404'
  }
]

const router = createRouter({
  history: createWebHashHistory(),
  routes: clientRoutes
})

export const serverMenus = useStorage<Menu[]>('serverMenus', [])
const serverRoutes = useStorage<Route[]>('serverRoutes', [])
addServerRoutes(serverRoutes.value)

export function addServerRoutes(routeList: Route[]) {
  for (const r of routeList) {
    if (r.parentName) {
      router.addRoute(r.parentName, {
        path: r.path,
        component: () => import(r.component),
        name: r.name
      })
    }
  }
  serverRoutes.value = routeList
}

export function resetRoutes() {
  for (const r of clientRoutes) {
    router.addRoute(r)
  }
  serverRoutes.value = null
  serverMenus.value = null
}

export default router
本文件重要的函数及变量
- addServerRoutes 函数向路由表中添加由服务器提供的路由,路由分成两部分
- clientRoutes 这是客户端固定的路由
- serverRoutes 这是服务器变化的路由,存储于 localStorage
- resetRoutes 函数用来将路由重置为 clientRoutes
- vue-router@4 中的 addRoute 方法会【覆盖】同名路由,这是这种实现的关键
- 因此,服务器返回的路由最好是 main 的子路由,这样重置时就会比较简单,用之前的 main 一覆盖就完事了
- serverMenus 变量记录服务器变化的菜单,存储于 localStorage
登录组件
动态路由应当在登录时生成,A6Login.vue
<template>
  <div class="login">
    <a-form :label-col="{ span: 6 }" autocomplete="off">
      <a-form-item label="用户名" v-bind="validateInfos.username">
        <a-input v-model:value="dto.username" />
      </a-form-item>
      <a-form-item label="密码" v-bind="validateInfos.password">
        <a-input-password v-model:value="dto.password" />
      </a-form-item>
      <a-form-item :wrapper-col="{ offset: 6, span: 16 }">
        <a-button type="primary" @click="onClick">Submit</a-button>
      </a-form-item>
    </a-form>
  </div>
</template>
<script setup lang="ts">
import { ref, onMounted } from 'vue'
import { Form } from 'ant-design-vue'
import { useRouter } from 'vue-router'
import axios from '../api/request'
import { useRequest } from 'vue-request'
import { AxiosRespToken, LoginDto, AxiosRespMenuAndRoute } from '../model/Model8080'
import { resetRoutes, addServerRoutes, serverMenus } from '../router/a6router'
const dto = ref({username:'', password:''})
const rules = ref({
  username: [
    {required: true, message:'用户名必填'}
  ],
  password:[
    {required: true, message:'密码必填'}
  ]
})
const { validateInfos, validate } = Form.useForm(dto, rules)
const router = useRouter()
const { runAsync:login } = useRequest<AxiosRespToken, LoginDto[]>((dto)=> axios.post('/api/loginJwt', dto), {manual:true})
const { runAsync:menu } = useRequest<AxiosRespMenuAndRoute, string[]>((username)=> axios.get(`/api/menu/${username}`), {manual:true})
async function onClick() {
  try {
    await validate()
    const loginResp = await login(dto.value
    if(loginResp.data.code === 200) { // 登录成功
      const token = loginResp.data.data.token
      const menuResp = await menu(dto.value.username)
      const routeList = menuResp.data.data.routeList
      addServerRoutes(routeList)
      serverMenus.value = menuResp.data.data.menuTree
      router.push('/')
    })
  } catch (e) {
    console.error(e)
  }
}
onMounted(()=>{
  resetRoutes()
})
</script>
<style scoped>
.login{
  margin: 200px auto;
  width: 25%;
  padding: 20px;
  height: 180px;
  background-color: antiquewhite;
}
</style>
- 登录成功后去请求
/api/menu/{username}获取该用户的菜单和路由 - router.push 方法用来以编程方式跳转至主页路由
主页组件
A6Main.vue
<template>
  <div class="a6main">
    <a-layout>
      <a-layout-header>
      </a-layout-header>
      <a-layout>
        <a-layout-sider>
          <a-menu mode="inline" theme="dark">
            <template v-for="m1 of serverMenus">
              <a-sub-menu v-if="m1.children" :key="m1.id" :title="m1.title">
                <template #icon><a-icon :icon="m1.icon"></a-icon></template>
                <a-menu-item v-for="m2 of m1.children" :key="m2.id">
                  <template #icon><a-icon :icon="m2.icon"></a-icon></template>
                  <router-link v-if="m2.routePath" :to="m2.routePath">{{m2.title}}</router-link>
                  <span v-else>{{m2.title}}</span>
                </a-menu-item>
              </a-sub-menu>
              <a-menu-item v-else :key="m1.id">
                <template #icon><a-icon :icon="m1.icon"></a-icon></template>
                <router-link v-if="m1.routePath" :to="m1.routePath">{{m1.title}}</router-link>
                <span v-else>{{m1.title}}</span>
              </a-menu-item>
            </template>
          </a-menu>
        </a-layout-sider>
        <a-layout-content>
          <router-view></router-view>
        </a-layout-content>
      </a-layout>
    </a-layout>
  </div>
</template>
<script setup lang="ts">
import AIcon from '../components/AIcon3' // jsx icon 组件
import { serverMenus } from '../router/a6router'
</script>
<style scoped>
.a6main {
  height: 100%;
  background-color: rgb(220, 225, 255);
  box-sizing: border-box;
}
.ant-layout-header {
  height: 50px;
  background-color:darkseagreen;
}

.ant-layout-sider {
  background-color:lightsalmon;
}

.ant-layout-content {
  background-color: aliceblue;
}

.ant-layout-footer {
  background-color:darkslateblue;
  height: 30px;
}

.ant-layout {
  height: 100%;
}

.ant-layout-has-sider {
  height: calc(100% - 50px);
}

</style>
token 使用
- 获取用户信息,例如服务器端可以把用户名、该用户的路由、菜单信息都统一从 token 返回
- 前端路由跳转依据,例如跳转前检查 token,如果不存在,表示未登录,就避免跳转至某些路由
- 后端 api 访问依据,例如每次发请求携带 token,后端需要身份校验的 api 需要用到
3) pinia
需求:在组件 p1 里更新了数据,主页组件也同步更新显示

- storage 虽然可以实现多个组件的数据共享,但是需要【主动访问】才能获取更新后的数据
- 本例中由于没有涉及主页组件的 mounted 操作,因此并不会【主动】获取 storage 的数据
安装
npm install pinia
在 main.ts 中引入
import { createPinia } from 'pinia'

// ...
createApp(A6).use(antdv).use(router).use(createPinia()).mount('#app')
定义Store
再新建 store 目录来管理共享数据,下面是 /src/store/UserInfo.ts
import axios from '../api/request'
import { defineStore } from "pinia"
import { UserInfoDto } from '../model/Model8080'

export const useUserInfo = defineStore('userInfo', {
  state: () => {
    return { username: '', name: '', sex: '' }
  },
  actions: {
    async get(username: string) {
      const resp = await axios.get(`/api/info/${username}`)
      Object.assign(this, resp.data.data)
    },
    async update(dto: UserInfoDto) {
      await axios.post('/api/info', dto)
      Object.assign(this, dto)
    }
  }
})
定义了 useUserInfo 函数,用来获取共享数据,它可能用于多个组件
- 命名习惯上,函数变量以 use 打头
state 定义数据格式
actions 定义操作数据的方法
get 方法用来获取用户信息
update 方法用来修改用户信息
- 由于 useRequest 必须放在 setup 函数内,这里简化起见,直接使用了 axios
获取用户信息
<template>
  <div class="a6main">
    <a-layout>
      <a-layout-header>
        <span>{{serverUsername}} 【{{userInfo.name}} - {{userInfo.sex}}】</span>
      </a-layout-header>
      <a-layout>
        <!-- ... -->
      </a-layout>
    </a-layout>
  </div>
</template>
<script setup lang="ts">
import { onMounted } from 'vue';
import AIcon from '../components/AIcon3' // jsx icon 组件
import { serverMenus, serverUsername } from '../router/a6router'
import { useUserInfo } from '../store/UserInfo'
const userInfo = useUserInfo()

onMounted(()=>{
  userInfo.get(serverUsername.value)
})
</script>
修改用户信息
<template>
  <div class="a6p1">
    <h3>修改用户信息</h3>
    <hr>
    <a-form>
      <a-form-item label="用户名">
        <a-input readonly v-model:value="dto.username"></a-input>
      </a-form-item>
      <a-form-item label="姓名" v-bind="validateInfos.name">
        <a-input v-model:value="dto.name"></a-input>
      </a-form-item>
      <a-form-item label="性别">
        <a-radio-group v-model:value="dto.sex">
          <a-radio-button value="男">男</a-radio-button>
          <a-radio-button value="女">女</a-radio-button>
        </a-radio-group>
      </a-form-item>
    </a-form>
    <a-button type="primary" @click="onClick">确定</a-button>
  </div>
</template>
<script setup lang="ts">
import { Form } from 'ant-design-vue'
import { onMounted, ref } from 'vue'
import { UserInfoDto } from '../model/Model8080'
import { useUserInfo } from '../store/UserInfo';
const dto = ref<UserInfoDto>({ username: '', name: '', sex: '' })
const userInfo = useUserInfo()
onMounted(()=>{
  Object.assign(dto.value, userInfo)
})
const rules = ref({
  name: [
    {required: true, message:'姓名必填'}
  ]
})
const { validateInfos, validate } = Form.useForm(dto, rules)
async function onClick() {
  try {
    await validate()
    await userInfo.update(dto.value)
  } catch (e) {
    console.error(e)
  }
}
</script>
- 不能直接把 userInfo 绑定到表单,需要 dto 中转一下
- userInfo.update 和 useInfo.get 返回的都是 Promise 对象,可以配合 await 一起用
后记
vite + vue3 + vue-router + ts 还没有太多成熟的项目范例,可以参考 GitHub - sendya/preview-pro: Use pro-layout in vitejs. preview https://sendya.github.io/preview-pro/index.html,它提供了基本的布局和样例